Welcome to the Precision Compandor Works HC Audio Decoder help page.
I sincerely hope that the information herein will help you to make better use of
PCW HC Decoder.
These help pages are valid for version 0.9.0 and later
PCW HC Decoder is a piece of software, written for PCs running the Windows operating system.
It allows you to decode audio recordings, specifically audio tape recordings that have previously
been recorded while using the compressor part of an audio compander system or noise-reduction system.
Such systems have extensively been used with audio cassette recorders in the 1970s and 1980s, and they
were known under such names as Dolby B (*) or HighCom (*).
PCW HC Decoder is designed to decode recordings made with the HighCom compander system. It is not suitable for recordings made with Dolby B and also not suitable for cleaning or for removing noise from any old tape recordings.
This software has been designed with appropriate care, it should not exhibit any harmful side effects. Nevertheless, you use it at your own risk. If you do not agree, then please do not use it.
Go to top.You can download the most recent version of this software in a zipped archive from here. Save the archive file on your computer and remember the location.
Go to top.When you download and install PCW HC Decoder, you are granted a personal, non-exclusive and unlimited license, completely free of charge.
Go to top.Double-click on the saved archive file. The archive should open and display a single file:
(The version information "x.x.x" reflects the current version.)
Start the installation by double-clicking on the executable file.
A welcome window will open. Click "Next" and the license agreement will be displayed.
If you agree to the terms of the license agreement then you should check the "I agree ..." box and
click on the "Next" button. Then installation will start.
The installation process is simple, there are no new DLLs, no additions to the registry file, and no changes to your
operating system. An entry will be added to the startup menu and an icon will be placed on your desktop.
The installation can be reversed without a trace left.
On certain installations of Windows 10 the automatic placement of an icon on the desktop may be prohibited. In this case you have to locate the program "PCW-AudioDecoder.exe" on your computer. With a right-click you open the context menu and then chose "shortcut".
In Windows 10 you can as well go to the Start Menu List and locate the entry for PCW HC Decoder. By left-clicking on the icon you can drag it onto your desktop.
You either double-click on the PCW-AudioDecoder shortcut icon on your desktop or you go to "Start" - "Programs" and locate the "PCW-AudioDecoder" entry. Double-click on "PCW-AudioDecoder", the program will start.
Go to top.
It is very easy to actually use this piece of software. But before you can use it, you have to perform a few steps
to transfer your analog tape or cassette recordings into a digital version on your computer.
Please read on.
First of all, you need a tape machine or cassette recorder that is able to play the tapes you want to
digitize to your PC. Preferably this should be the same tape machine or cassette recorder that has been used to record the tapes or cassettes in the first place. But in many cases these machines will not be available any more. Instead, you can use any suitable and working tape machine, cassette recorder or cassette playback-only machine.
In order to do the actual transfer from analog tape to a digital file on the PC, you have to check a few special items:
Most table-top PCs do have a "line" audio input. This is the right place to connect to the audio output of your tape playback machine.
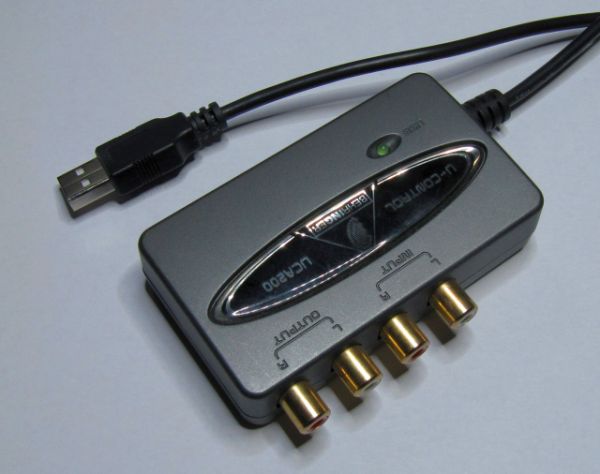
But many laptop PCs only have a "Mic" input. In most cases this input will not give good results. Luckily, there are small and cheap alternatives: audio interface boxes with USB connectors, see next picture.
Just plug this interface into an empty USB socket and connect the output of your tape playback machine to the "L" and "R" "Input" (cinch) sockets of the adapter.
You have to make sure that the interface is able to digitize audio signals with one of the higher sampling frequencies like 88.2 kHz or 96 kHz. More on that further on.
Next you need a piece of software that lets you actually record the analog audio signals in digital form and store them as a ".WAV"-File onto your PC.
A powerful and free piece of software suitable for this task is "Audacity", that you can get from here:
https://www.audacityteam.org
Download and install, then start the program.
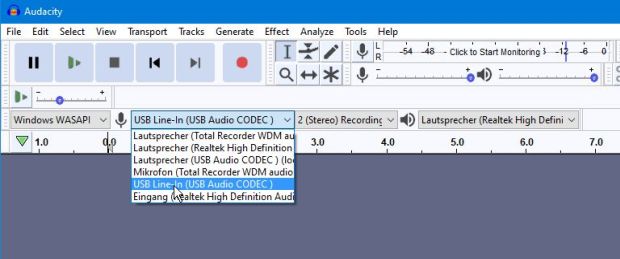
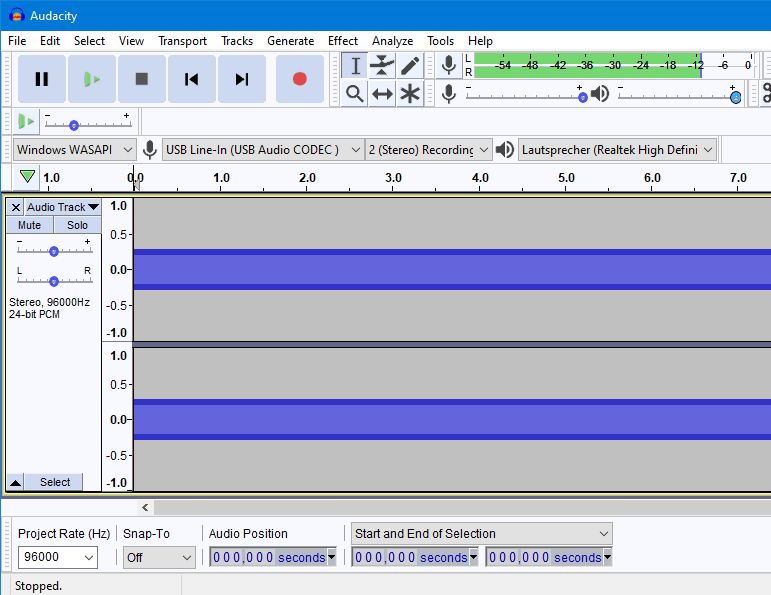
As a first step you should identify your audio input device. There is a drop-down menu, and in this case we use the
device with something like "USB" in the name.
Next you should adjust the quality preferences. Select Edit/Preferences/Quality and adjust the Default Sample Rate to 96000 Hz and the Default Sample Format to 24 bit. These values are not mandatory but help preserve the over-all quality.

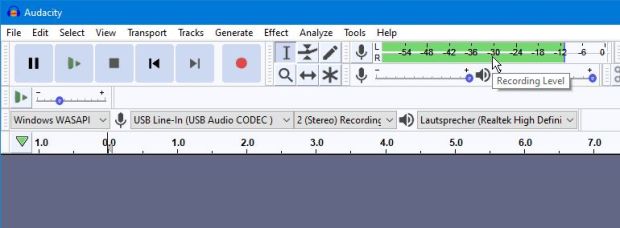
Now go to the top row where it says "click to start monitoring"
When everything is OK, you should now see some reaction on any input signal you have connected. In this example
there was a 400 Hz signal with level 10 dB below digital maximum.
OK, hit the red button - and recording should start.
Then, after a few seconds, hit the "stop" button, the one with the black square.
With a constant signal like above you will probably get something like this:
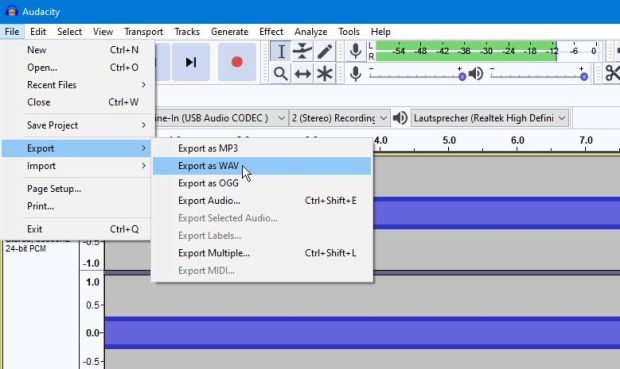
Finally you need to save the digital recording to your hard disc storage system.
Select File/Export/Export as WAV
Now you have to decide where to store the recording and what name it should have. Don't forget to select
the correct format under "Save as type":
From the drop-down menu select "WAV (Microsoft) signed 24-bit PCM".
That's it - you have successfully created a digital audio file from the analog audio input.
In the analog world on your cassette recorder and on the tape there is a certain "reference level", which can be marked in different ways, e.g. as "0 dB", "0 VU" or simply as the border between differently colored parts of the level indicator.
When you want to transfer an anlog recording into a digital file on your computer, you have to establish a correspondence between this "reference level" on tape and a certain "digital value". For this it is customary to relate "0 dB analog" with a digital level of about 10 dB below absolute digital maximum.
To establish this relation you should take the following steps:
OK, you have a digital audio file in .WAV format that contains an audio signal. And this audio signal has previously been compressed by the High Com compander system. Now you want to decode it, digitally.
OK, simply launch PCW HC Decoder. You will see this work area:
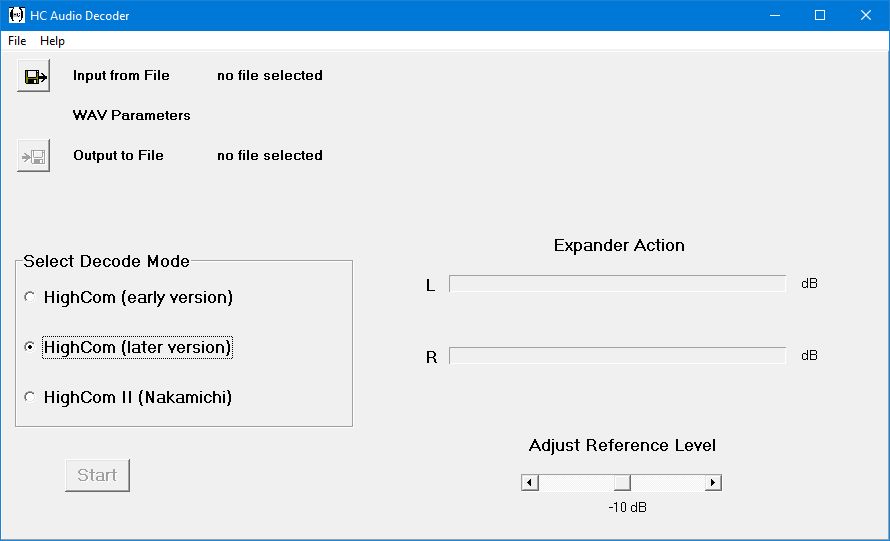
You'll notice that three different modes of operation can be selected, and that "HighCom (later version)" Decode Mode is preselected. (More on these different modes is here)
Now, click the top left icon to find and select the name of your input .WAV file. Then click the output file icon below. The name of the output file is preset with the name of your input file with "_dec" appended. You can select any suitable directory or name for the output file.
When you have selected both files, the Start button becomes active. And after pressing this, processing will start. While processing is going on, the gain gauges will show the gains applied in each of the two channels. The Start button changes into an Abort button that enables you to stop the processing before it ends automatically.
After processing is done, the elapsed processing time is shown on the bottom.
Please note, that you cannot immediately start the same process again. When you want to do just that, you first have to select the input and output files again. This is easy, as the previously selected file names are remembered and shown in the file selection windows.
Go to top.When the HighCom compander system was first introduced, it was based on the Telefunken integrated circuit U401B. So in the earliest cassette recorders equipped with HighCom you will find this IC or one of its variants U401BG and U401BR. Shortly after its introduction, an additional circuit was used that you can actually see as a piggy-back circuit on top of the IC.
In case that you do not know which version may have been used to generate your analog recordings, just start with "HighCom (later version)". When you get unsatisfactory results, you should alternatively try "HighCom (early version)".
There has been a third and very different version of the HighCom compander system. This was the version used by the Japanese high-end company Nakamichi in their separate compander device, named HighCom II. If you are certain that your recordings have been made with this version of HighCom, then please use this option.
Go to top.
If you encounter a problem not covered on this help page, then please send an
EMail with a clear description of your problem.
Please allow for a reasonable response time.
Any feedback is highly appreciated. Please send an EMail and describe what is missing or what you have found out. And if just in case you find this software helpful and supportive for your work, why not send a short message?
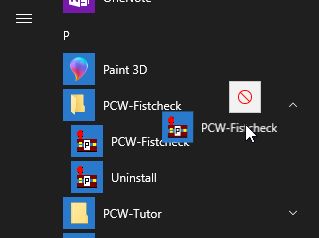
Go to top.If you want to install a newer version of PCW Fistcheck, then you do not have to uninstall any older version. Just install the new version over the older version.
Go to top.That's easy: select "Start" - "Programs" from your task panel, then identify the entry for PCW HC Decoder. Within this folder you will find a shortcut with the name Uninstall. Double-click and follow any instructions. Voilá, PCW HC Decoder is removed from your system, very probably without a trace.
Go to top.(*) Trademarks are property of their respective owners.